data storage v2.0
Overview
The Data Storage connector allows you to SET and GET arbitrary data and/ or perform more complex operations on lists and objects. It's ideal for when you wish to work with stored data. Data that you may also want to share between multiple workflow steps or within your Tray.io organisation etc.
If this is your first time using the Data Storage connector please make sure to read through the Basic Principals section below. Understanding these fundamentals will help you manipulate data and build more effective workflows.
Basic Principals
Key - Value pairs
This connector operates using a key-value store whereby key is the name of the field and value is the actual value of that piece of data.
For example a piece of data might have a key of first_name and a value of Roger.
You are essentially able to set "any" type of value you like and then use said value's key as a reference point to retrieve it. So when referencing the key first_name the data returned (i.e. value) will be Roger.
Default Value
If the given key is not found then the default value will be returned - which can be set to anything.
This is really useful for initialising new lists, strings, or counters that you plan to add things to.
Instead of receiving null the first GET call for a new key can return an empty list, empty string, or 0, etc.
Scope
Every Data Storage operation requires the Scope field to be selected before proceeding. Please read through the differences carefully before selecting your Scope type.
Usually you will be presented with the following three (if not two) options
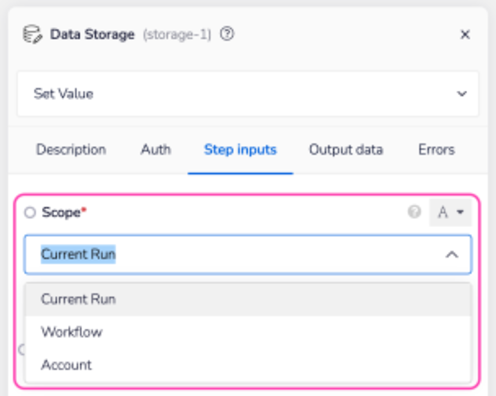
Current Run vs Account
Unless you specifically need to share data between multiple executions of your workflow (or multiple workflows) we recommend selecting Current Run over Account. This will help prevent you taking up storage space and unnecessarily keeping information that would otherwise be useless to you.
Note that if too many simultaneous requests are made to the same key/ value while using either Workflow scope and/ or Account scope it might result in data inconsistency. Take a look at our Possible issues section below for more details.
Possible Issues
Multiple calls (Workflow/ Account)
When using either Workflow or Account scope, if several executions are concurrently loading, modifying, and then saving a value under the same key etc, the implementation order cannot be guaranteed. So you may wish to consider using a method or workflow layout that will help do so. Our Delay connector is often used in cases such as these.
Multiple objects
Your workflow calls will be more effective when dealing with multiple, single items under different keys if they are presented as a list as oppose to separate entities.
Clearing Account level dataXXXXXX
You will often need to clear Account level data. This is particularly true when building and testing workflows which might error out and leave values/ lists set in such a way which will mean you can't run your workflows again. Two suggested ways of dealing with this are as follows.
Data retention policies and storage limitsXXXXXX
To allow for delays in workflow completion, data stored under Current Run scope is stored for 30 days from execution.
Important Notes
Advanced Operations
Be aware that the Add to Collection and Shift Collection operations should only be used as a last resort. This is because they have reliability and performance limitations if used in Workflow or Account scope. They can be used to implement a queue but if possible we advise you to use the AWS SQS connector instead where possible.
Dealing with Data
Node limitations
Under a singular key, the max size is 400kb.
Batch Processing
It is good practice to receive each batch from a given service, do the processing, and then push each processed batch to the destination service. For example you can store the starting row for the next batch to retrieve. First time through, the data storage would contain the value 0. Then after receiving the first say 10,000 rows, the data storage would then contain the value 10,000, so when I receive the next batch, I know to start at row 10,000.
Bulk delete Account Level storage
The quickest way to bulk delete keys or values from your Account Level storage is to create a loop based workflow. It can then iterate through the list of items and individually delete each one.
Pulling data
USER TIP: API limitations aside there are a number of factors you should consider when pulling data in from another service:
- Number of rows API allows for
- Suppose you have rows with a single column that contained boolean values. You can pull in tonnes of rows in this scenario.
- How much data is on each given row
- Suppose you have rows with 15 columns where each column value could contain walls of texts or large json values. In this scenario, you would pull in much less rows at a time.
- The amount of data that can be ingested from step to step in a workflow
- The best thing to do is to find the sweet spot for the maximum size of batches of data to move around. It is also best to design your workflows in such a way that you will be batching your requests. You never know how much data you'll actually be pulling from your service, so it's best to put in good design to handle these types of situations.
Operations listXXXXXX
Below is a full list of operations currently available within the Data Storage connector and a brief summary of how they are used.
Add to Collection (adv.)
Append to List
Atomic Increment
Await Get Value
Delete from List
Delete Value
Get all Keys
Get Value
Set Value
Set Value in List
Shift Collection (adv.)
- 'Set / Get Value' Example
- Notes on Getting and Setting
- The 'Atomic Increment' Operation
- 'Append to List' example - Add Item to a List in Data Storage
'Set / Get Value' Example
In this example we're going to show you a simple use case for the Get and Set operation of the Data Storage connector. In our case we're pulling account details from accounts in Salesforce and adding the Annual Revenue up to send a slack message with the total. In this example we're using a manual trigger but you could set this to a scheduled trigger to receive a daily update.
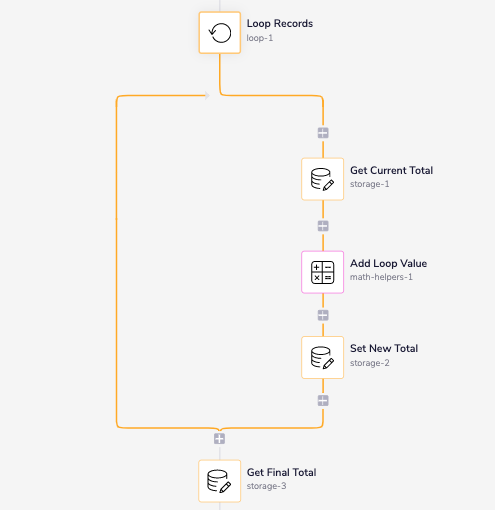
Here's what your finished workflow will look like
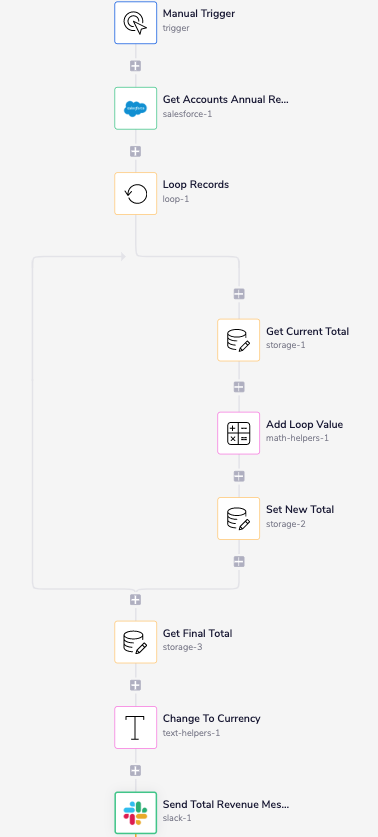
Step 1 - Get Account Records
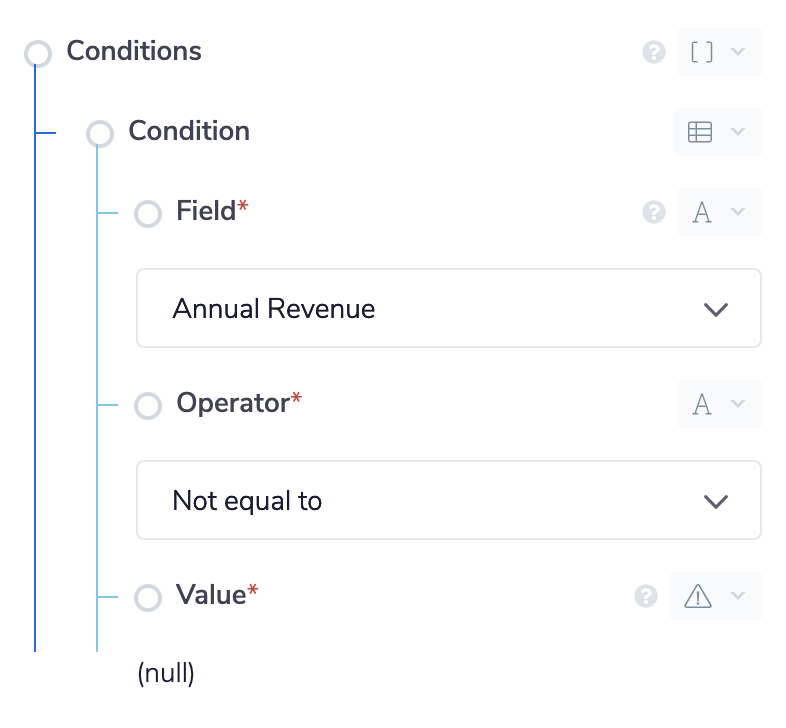
Add the Salesforce connector to your workflow. In the properties panel set the operation to Find Records. Set the Record type to Account and add a field to the fields section. Set the field to Annual Revenue.
 For the conditions we want to make sure that we aren't being returned any accounts that have a null value for the Annual Revenue field. This is because we only care about accounts that actually have Annual Revenue.
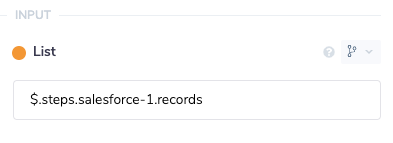
Step 2 - Loop Over Records
Next up we'll add in a loop connector to loop over each record and add up the values. Set the list value of the loop connector to the output of the Salesforce connector.
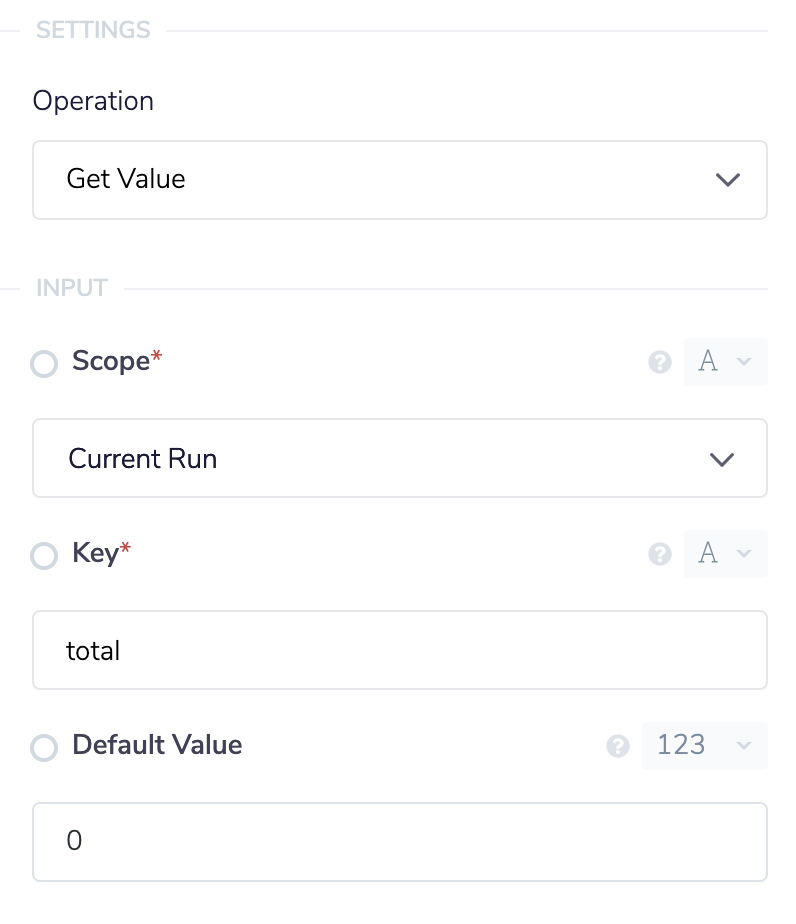
 Inside of our loop connector we'll start with a Data Storage connector. We'll set this to the Get Value operation and set the Key field to total. You can set this field to whatever you'd like but try to name keys in a way that describes what is being stored. We'll set the default value to 0 with the type number. The default value will be returned if no value has been set yet so on the first run it will return 0.
Here's the properties panel for the data storage connector
Inside of our loop connector we'll start with a Data Storage connector. We'll set this to the Get Value operation and set the Key field to total. You can set this field to whatever you'd like but try to name keys in a way that describes what is being stored. We'll set the default value to 0 with the type number. The default value will be returned if no value has been set yet so on the first run it will return 0.
Here's the properties panel for the data storage connector
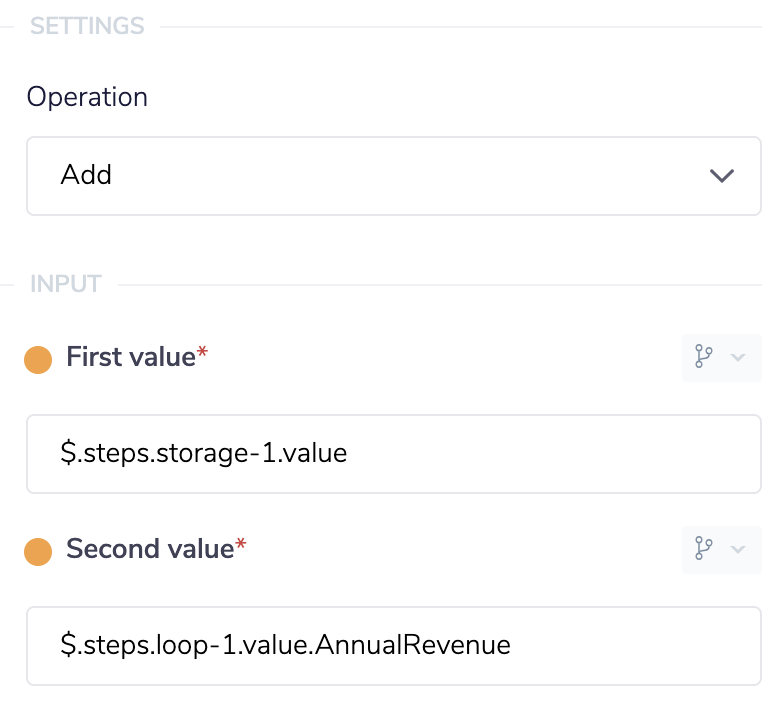
 After getting the current total we then need to add in the amount for the record our loop is currently on. Use the math helper to add two values together. Select the Add operation and, using the connector snake(you can learn more about the connector snake here, set the first value to the output of the data storage connector. For the second value we want to use the Account Revenue value of the current record our loop is on. Using the connector snake select the loop connector and select value from the output list. In our example the value is a key/ value pair with the key "Account Revenue" so we will have to add that to the end of our JSON path.
This is the full set up of the math helper connector panel
After getting the current total we then need to add in the amount for the record our loop is currently on. Use the math helper to add two values together. Select the Add operation and, using the connector snake(you can learn more about the connector snake here, set the first value to the output of the data storage connector. For the second value we want to use the Account Revenue value of the current record our loop is on. Using the connector snake select the loop connector and select value from the output list. In our example the value is a key/ value pair with the key "Account Revenue" so we will have to add that to the end of our JSON path.
This is the full set up of the math helper connector panel
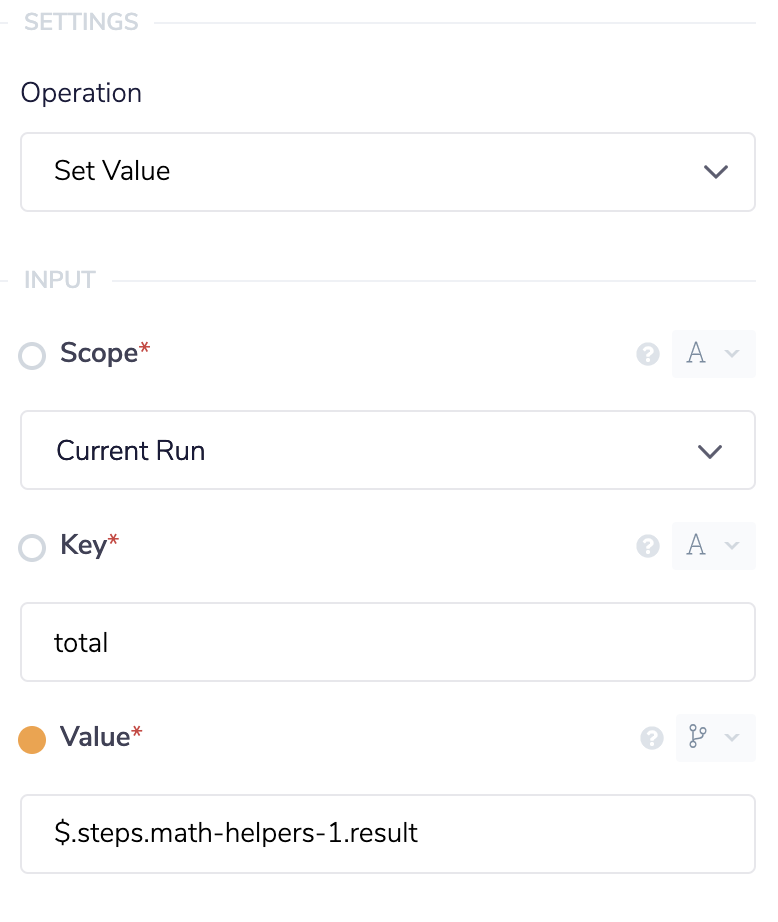
 Now that we have the result of the current total plus the amount for the current record we're on we now want to store this new updated value. Drop another data storage connector after the math helper and set the operation to Set Value. The important part here is to set the key to the same value as you did with the first data storage connector. This will make sure to overwrite the old value with our new updated value.
Here's the property panel
Now that we have the result of the current total plus the amount for the current record we're on we now want to store this new updated value. Drop another data storage connector after the math helper and set the operation to Set Value. The important part here is to set the key to the same value as you did with the first data storage connector. This will make sure to overwrite the old value with our new updated value.
Here's the property panel

Step 3 - Retrieve Final Total
We have now stored our total Account Revenue and can access it with another data storage connector. Drop another data storage connector onto the workflow but this time outside of the loop. We will use the Get Value operation to retrieve the final total. Again set the key to the same key you did with the other connectors so we retrieve the right value.
Step 4 - Send Slack Message
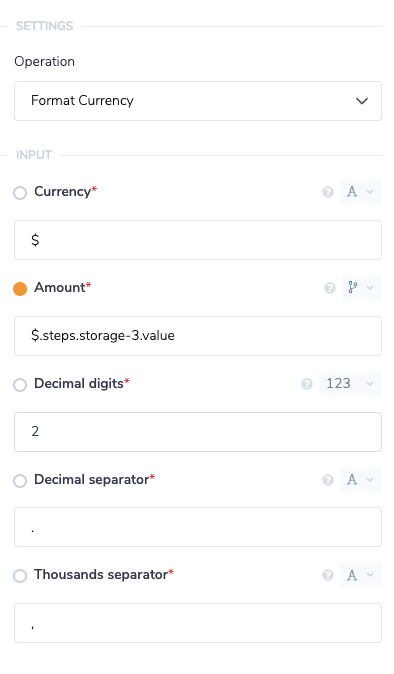
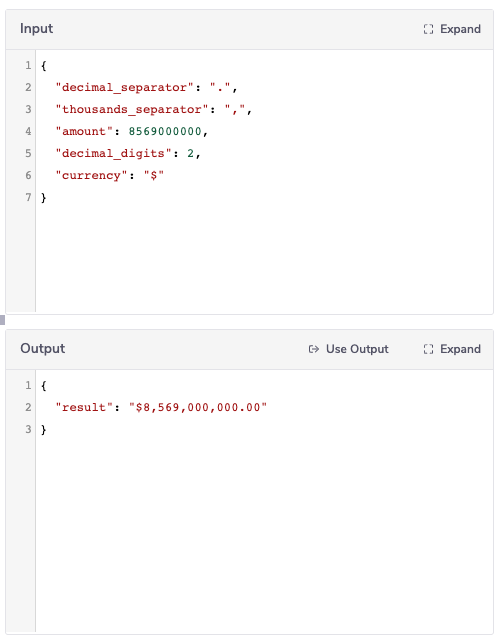
To send the Slack message with your new total we first want to modify the number to be a currency instead of a plain number. You don't need to take this step but it makes the message a bit more readable. Drop a text helper onto the workflow and set the operation to Format Currency. Type the currency you would like to use in the currency field. We'll set the amount, using the connector snake, to the output of our data storage connector.
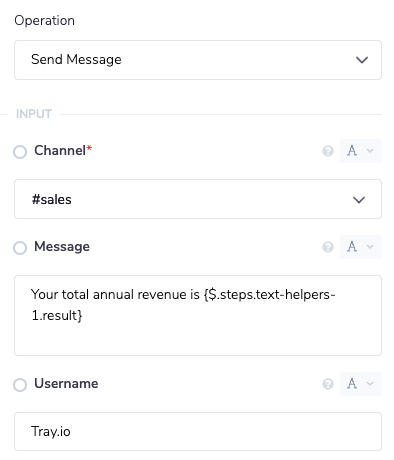
 All we have to do now is add in a Slack connector to handle sending our message. Set the channel to the relevant Slack channel. For the message field we'll inject our total into the message. Using
 {$} we can access the output of the text helper and embed the total in our message.
Set your up your slack connector like this
 The message in Slack will look like this

The Atomic Increment operation
The Atomic Increment operation is basically a counter which increases by one every time it is hit. This can be used in loops so that you can count every time an action is taken. Please see the tutorial on Workflow Threads for an example use case.
'Append to list' example - Add Item to a List in Data Storage
The Data Storage Append to List operation will take any given value and add it to the end of a pre-existing list. Additionally, if the list does not already exist in data storage and the Create if missing checkbox is selected it will create a new list with the value entered as its first item.
Note that you can also use the Set in List operation to override values under given indices in the list.
In this example we will use the scheduled trigger to run on a weekly cadence to collect all new Contacts in Salesforce, we will then process these Contacts into a list that can be accepted as input by the Iterable connector. We then use the Iterable connector to add the new contacts to a marketing Subscription List in Iterable. The completed workflow will look like this:
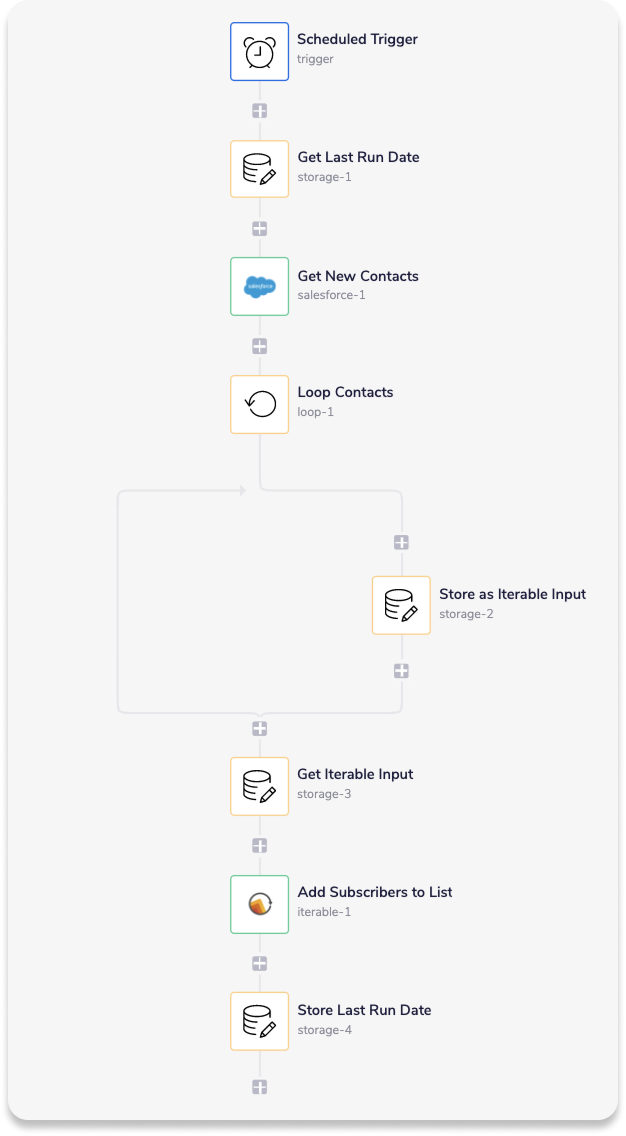 The principle benefit of running a workflow like this is to reduce the number of API calls you would otherwise be making if you were to update each Contact in Iterable individually. For instance you can update multiple records with two API calls (i.e. one Salesforce and one Iterable call) as opposed making two individual API calls for each record, thereby reducing your task count for the relevant service.
Step 1 - Setup the Schedule Trigger
Setup the Schedule Trigger to run on a weekly cadence.
Step 2 - Use the Salesforce connector to find all new Contact records
Before we can add the Salesforce connector to Find the relevant Contact records we must produce the conditions it is going to use in its search.
To find all new records we'll set the Created Date condition to be Greater than the date the workflow was last run. To store and use the last run date we'll use the Get Value and Set Value operations of the Data Storage connector at the Workflow scope level. Setting it to the Workflow scope will make the data persist between the individual runs of the workflow.
 __ Set the value, last_run, to the timestamp created by the Schedule Trigger
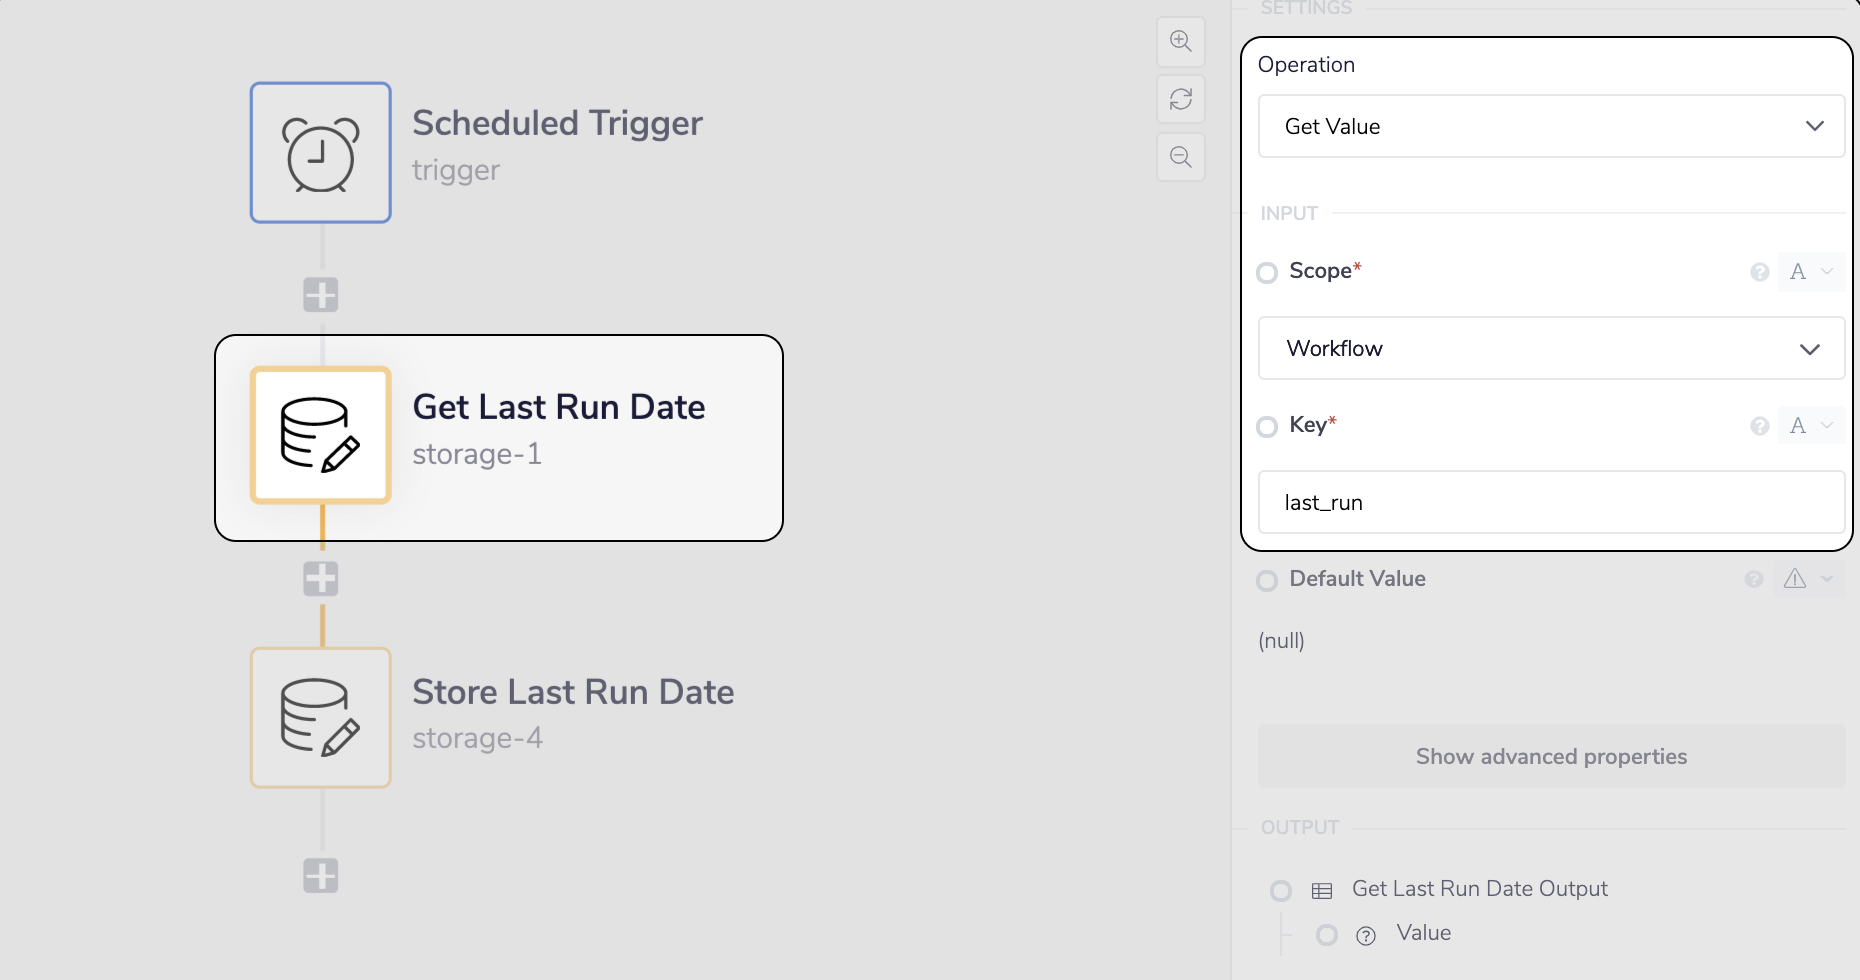 __ Get the last_run value at the beginning of the workflow
NOTE wait for the workflow to run at least once in its current state, this will allow
__ Get the last_run value at the beginning of the workflow
NOTE wait for the workflow to run at least once in its current state, this will allow data-storage-4 to store the last_run value.
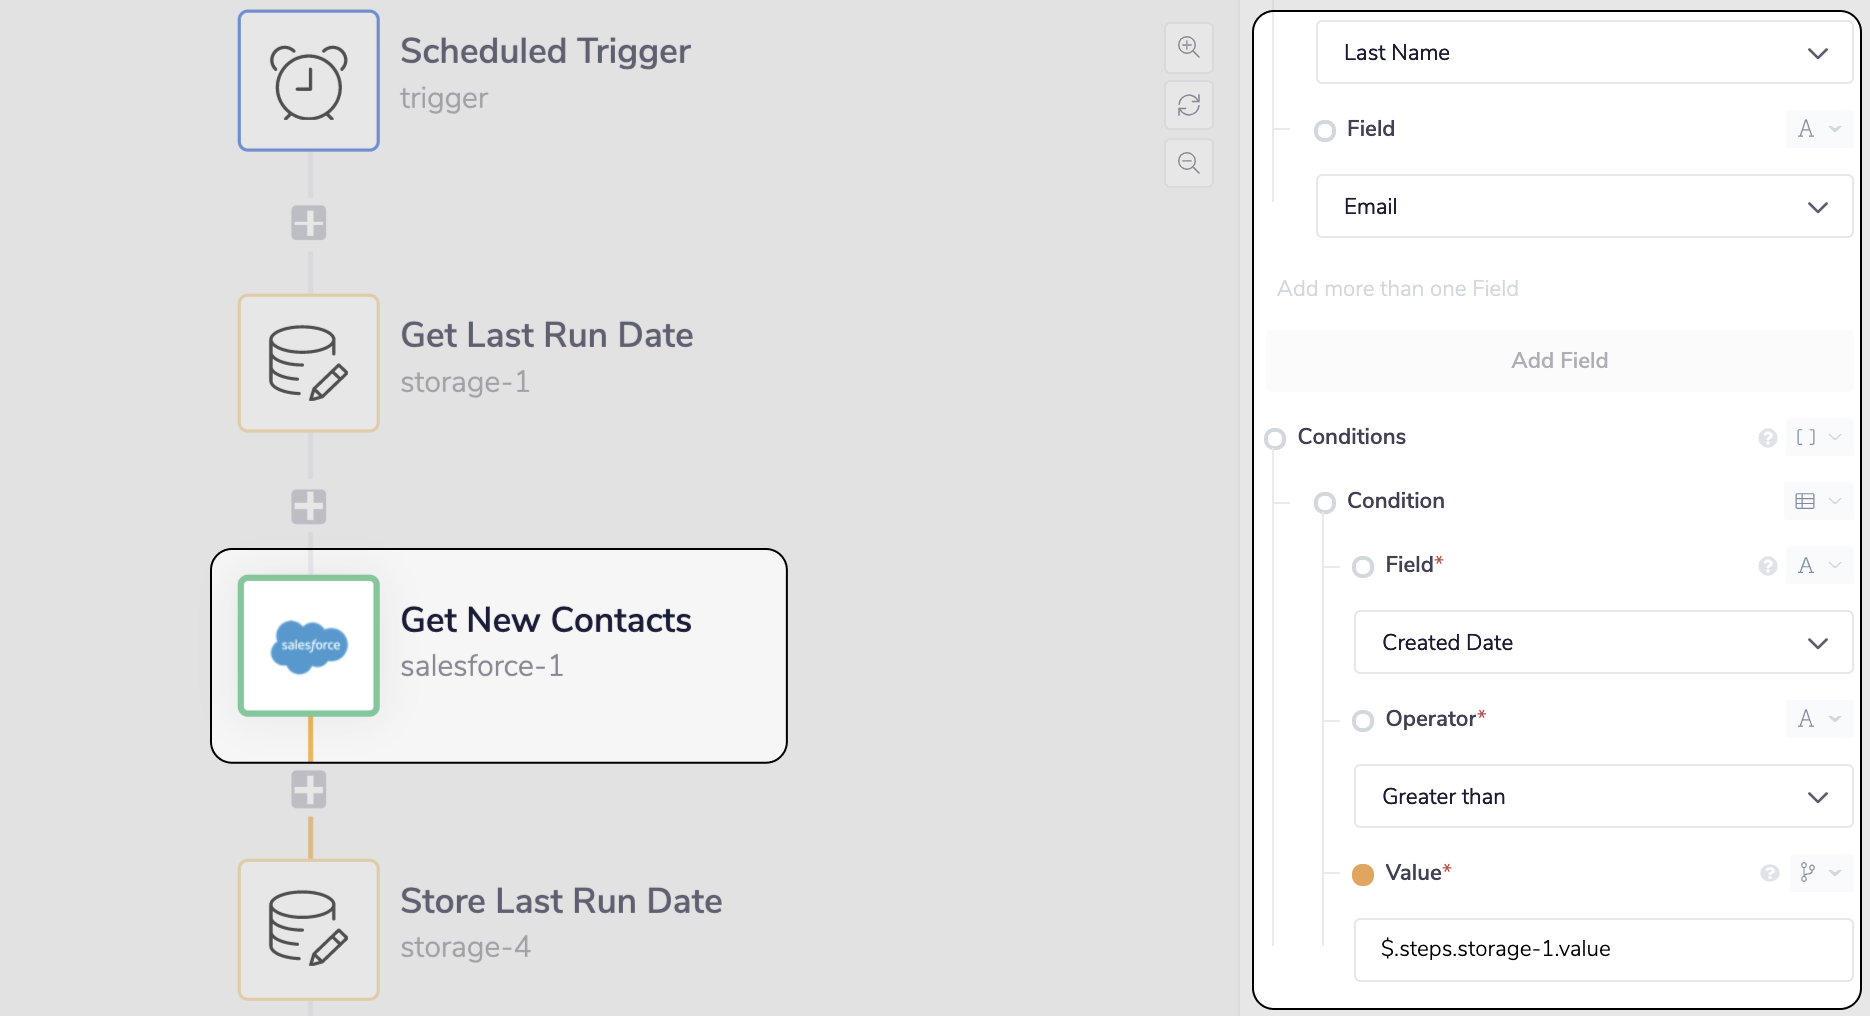 Add the Salesforce connector with the
 Find Records operation to return the records with the above conditions
Step 3 - Loop through the Salesforce Contacts and store as Iterable input
We can now use the Loop connector to help us create the Iterable input for each of the Salesforce Contacts. First add the Loop connector to iterate through the Contacts list produced by salesforce-1.
 __ Add the Loop connector to iterate through the Salesforce Contacts
Now add another Data Storage step with the
__ Add the Loop connector to iterate through the Salesforce Contacts
Now add another Data Storage step with the Append to List operation and select the tick box Create if missing. The Create if missing tick box will allow the connector to create a new list if it can't find the value with the given key (i.e. the first time it runs). We do not need this data to persist outside of the current run so the Scope can stay at the default Current Run value.
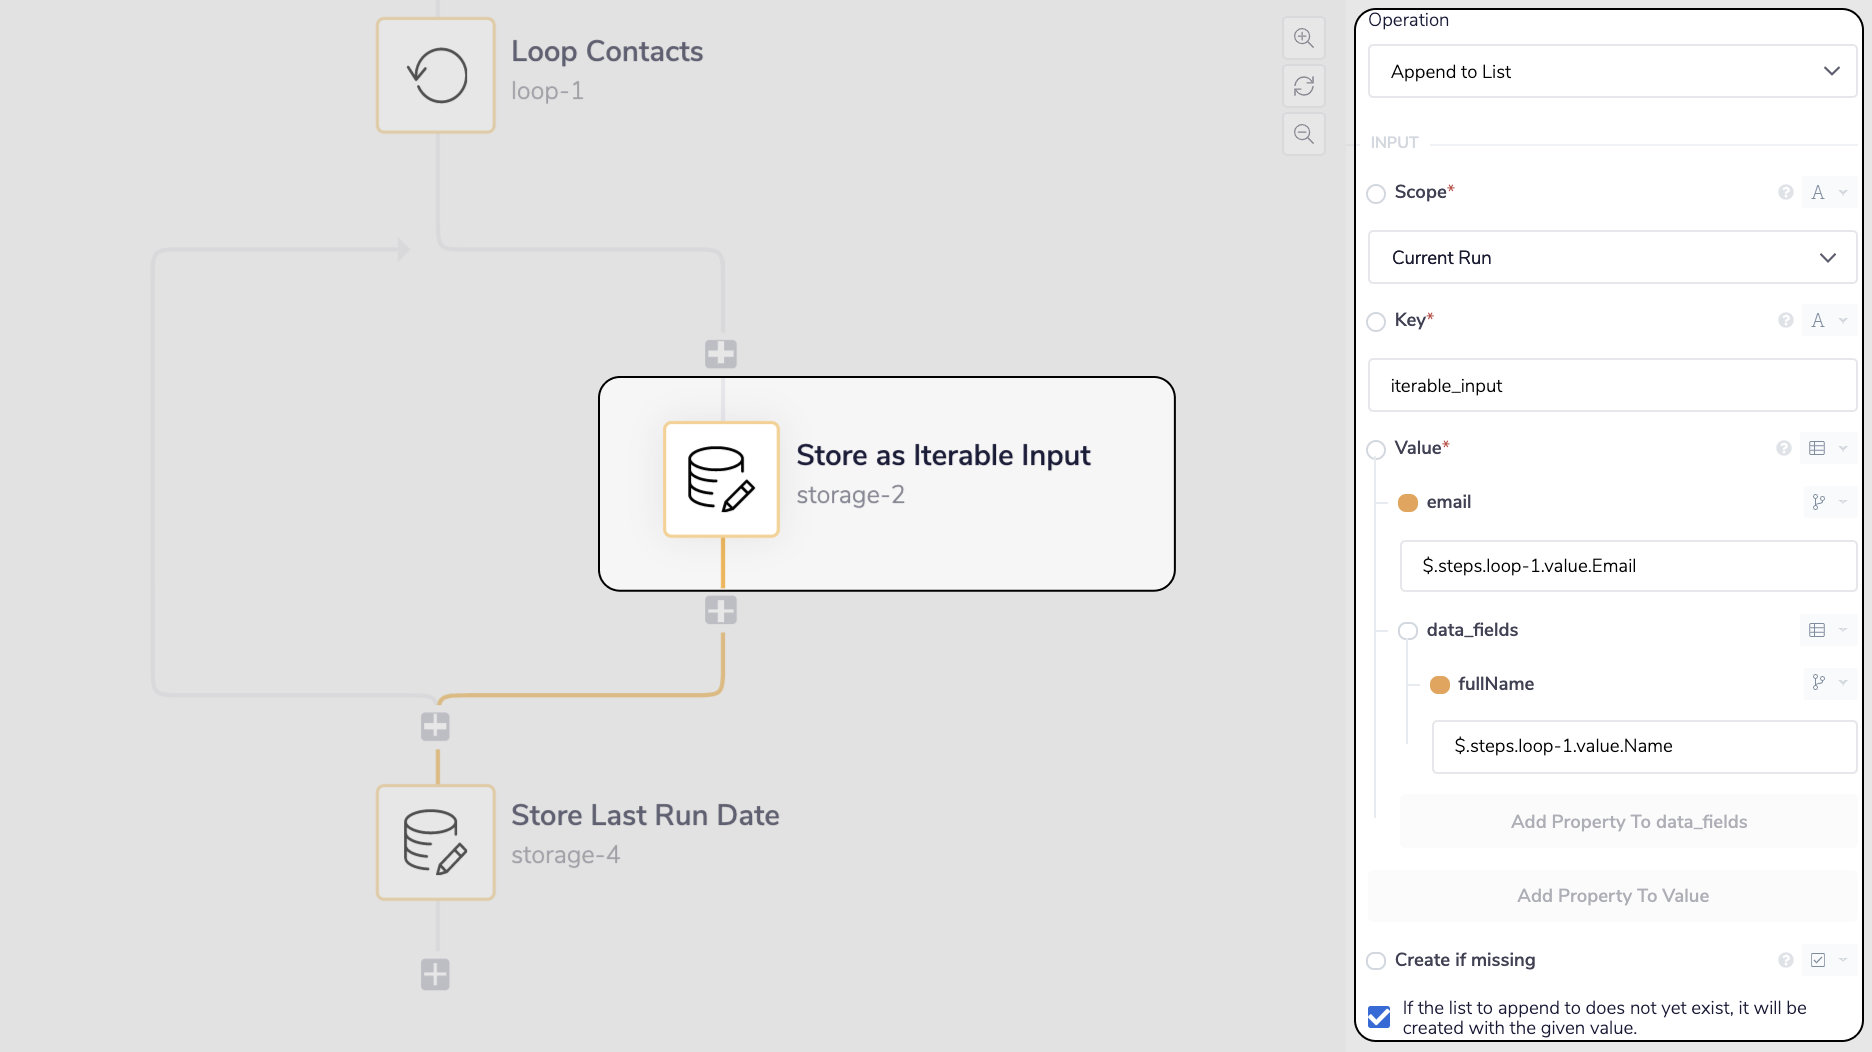 __ Store the Salesforce Contact as Iterable input
For each Salesforce Contact we will now be creating its individual Iterable input and saving it to a list in Data Storage.
__ Store the Salesforce Contact as Iterable input
For each Salesforce Contact we will now be creating its individual Iterable input and saving it to a list in Data Storage.
Step 4 - Expose the Iterable input list and add the Contact to Iterable
Now that we have created the list in Data Storage we can simply expose it with the Get Value operation, and add it to our Iterable Subscribers List with the Iterable connector.
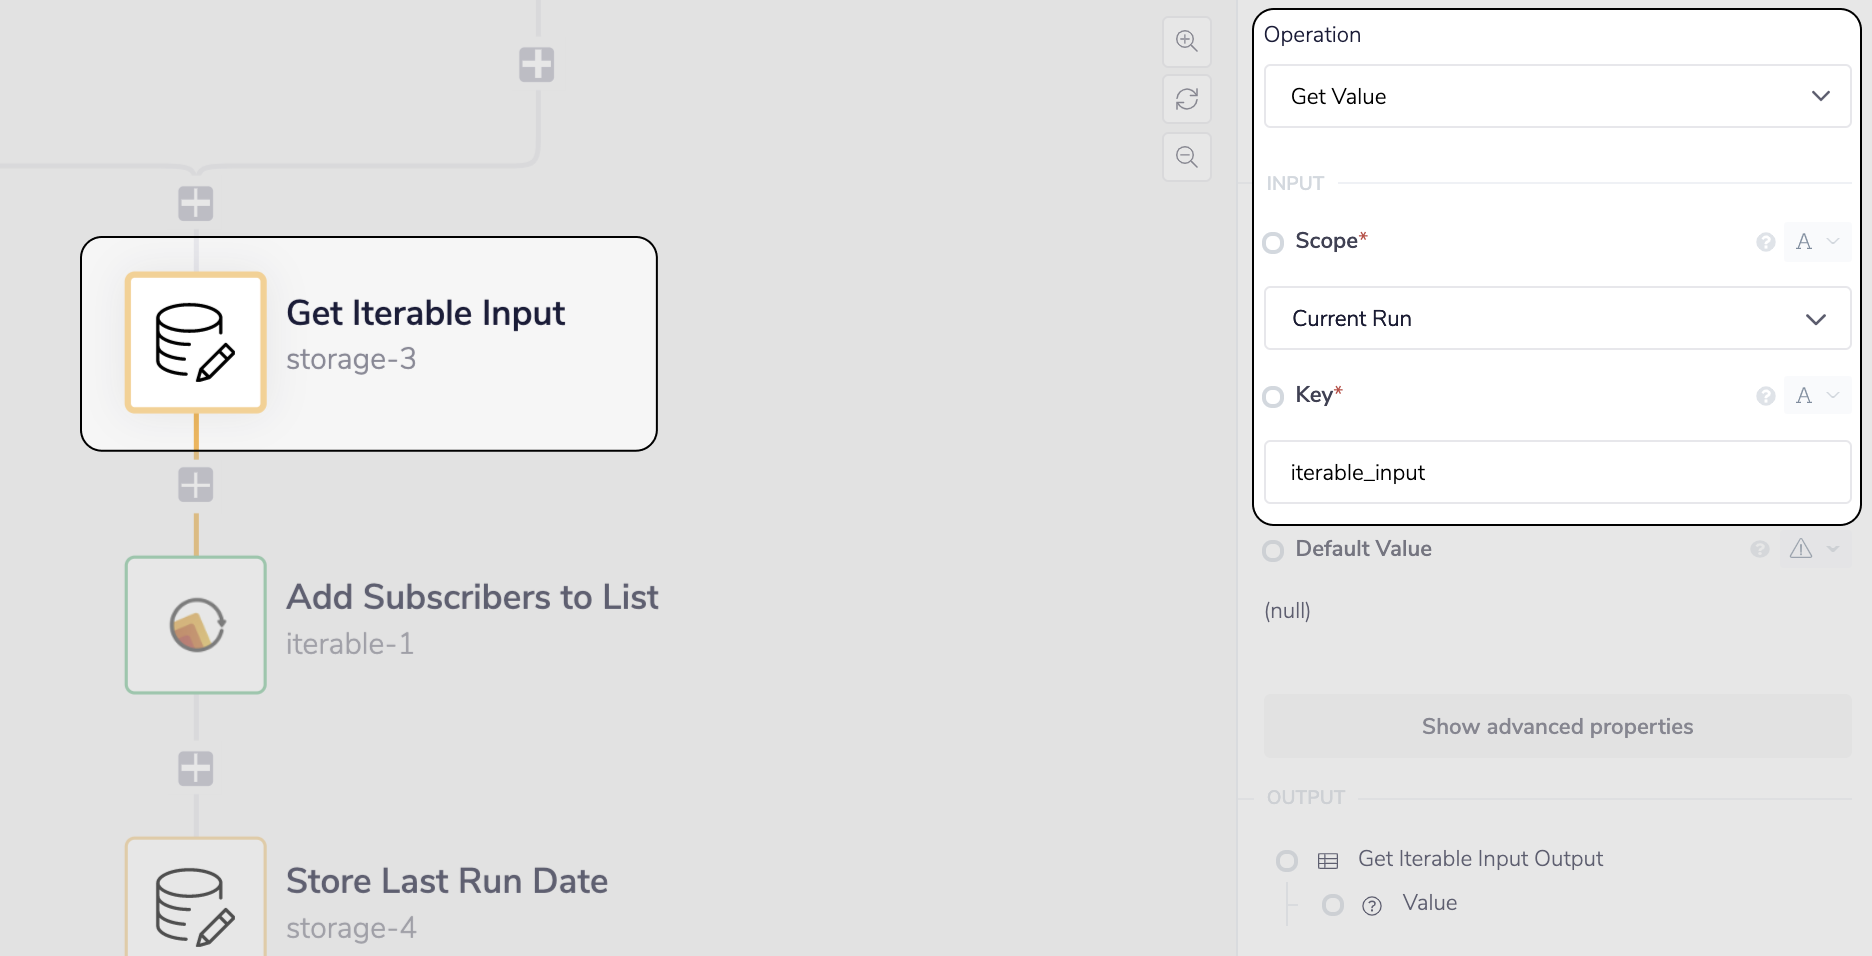 __ Expose the iterable-input value with the 'Get Value' operation
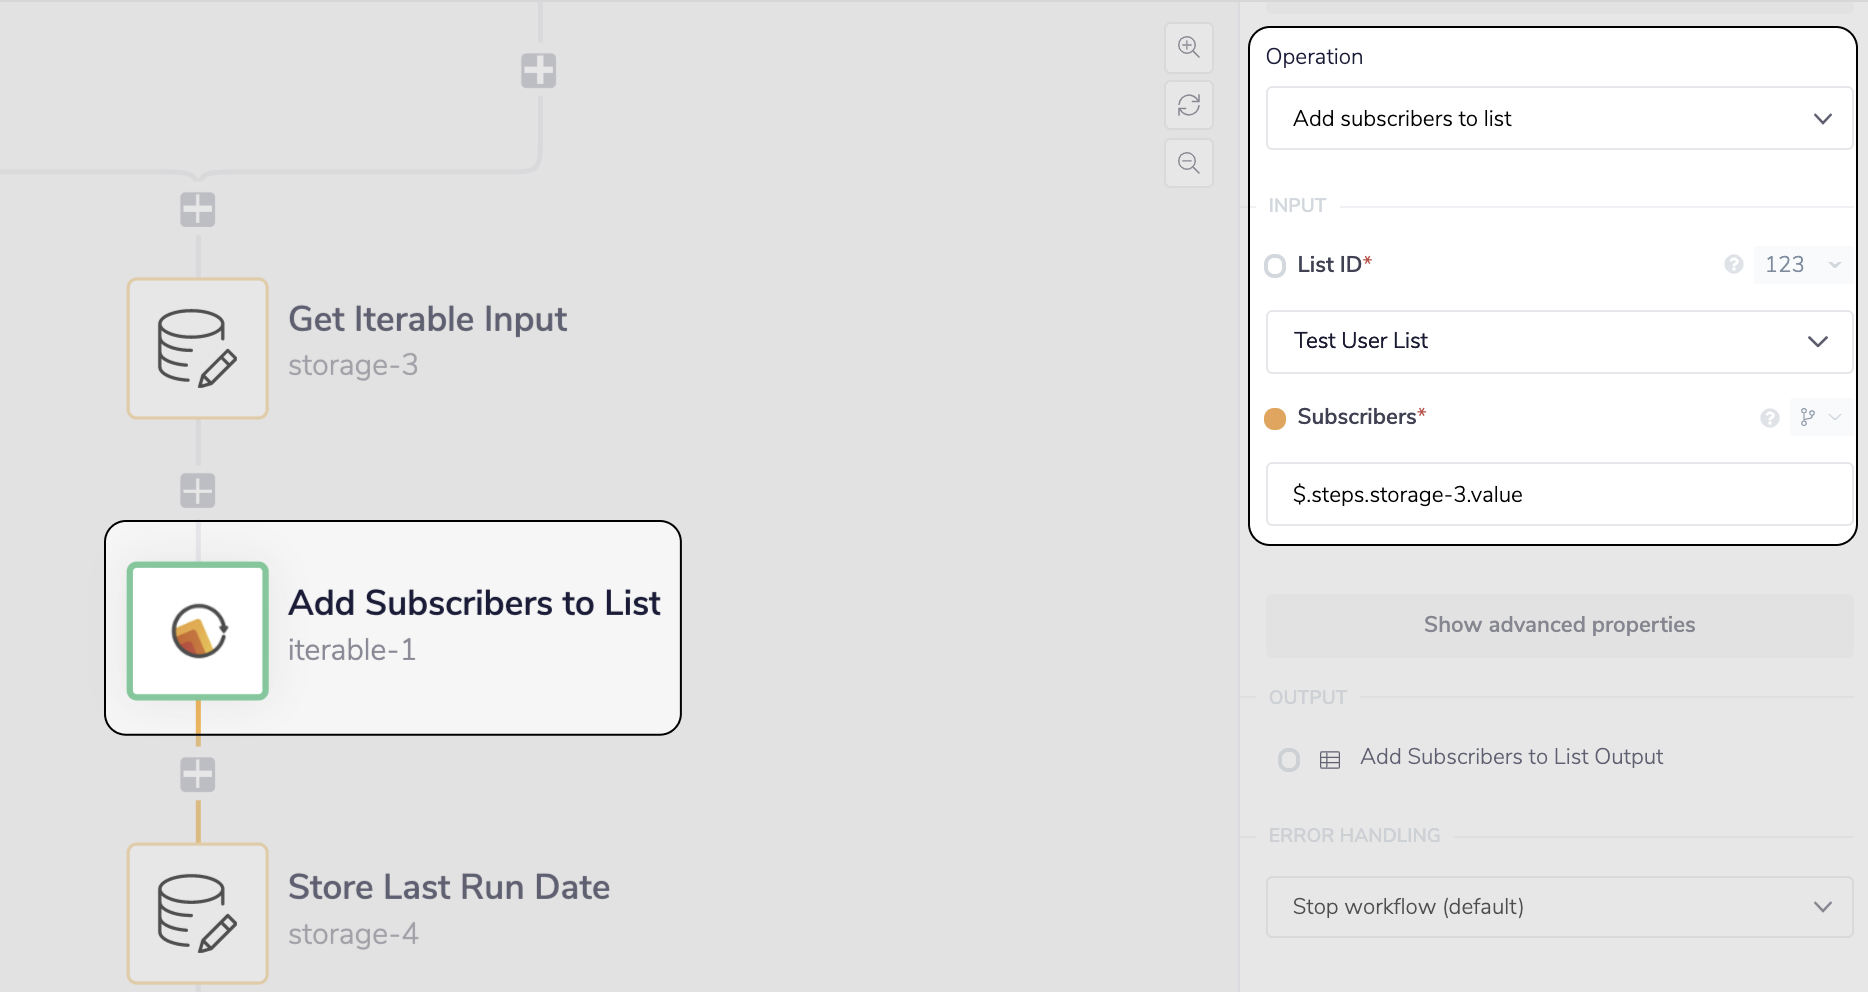 __ Add the Contacts to a Subscribers List with the Iterable connector
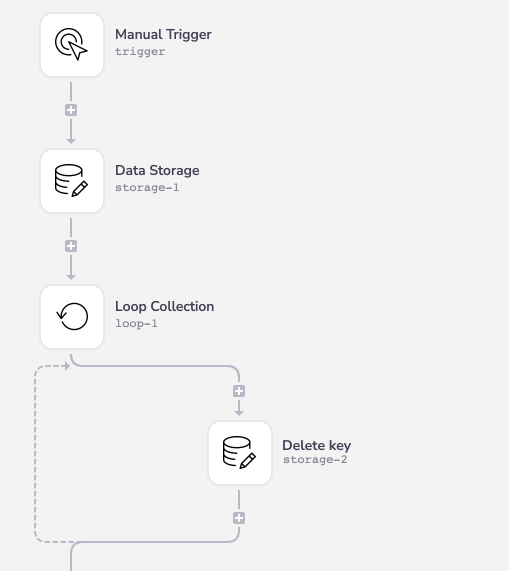
'Delete from List' example
Please see our Data storage queue documentation for an example of this operation in use. Take particular note of how the index is used - if you are looping through a list one-by-one and deleting each item as you go, the index should be set to 0 in order to delete each item from the top of the list.