Trigger
This connector was updated from version 5.0 to 6.0. Review the breaking changes below before updating your workflows.
Overview
The HubSpot Trigger connector allows you to initiate workflows when specific events occur in HubSpot. Receive real-time notifications for CRM events, property changes, and custom actions to automate your business processes.
Version 6.0 introduces a more flexible subscription format with property-level filtering capabilities and enhanced event configuration.
Available Operations
- Webhook (event subscription) - Subscribe to CRM events and property changes
- Webhook (custom actions) - Receive notifications from HubSpot workflows
API Information
The Base URL used for this connector is https://api.hubapi.com.
More information can be found in HubSpot's Webhooks API documentation. Webhooks must be served over HTTPS from a publicly accessible endpoint.
Breaking Changes in Version 6.0
Version Summary
The HubSpot Trigger connector has been updated from version 4.0/5.0 to 6.0 with significant changes:
- Authentication: Token authentication removed; OAuth2 only
- Subscription Format: Array format has been adopted to provide more flexibility
Authentication Changes
Removed: Token authentication (private apps)
Why: HubSpot deprecated private app tokens for webhook functionality. Private applications do not support webhooks.
Required: OAuth2 authentication only
Migration: All workflows using token-based authentication must be updated to use OAuth2 authentication. See the Authentication section below for setup instructions.
Subscription Schema Changes
The subscription configuration format has fundamentally changed to provide more flexibility and control.
Old format (v4.0/v5.0):
{
  subscription_types: {
    "contact.creation": true,
    "contact.propertyChange": true,
    "deal.deletion": false
  }
}
New format (v6.0):
{
  subscription_types: [
    {
      standard_event: {
        object_type: "contact",
        event_type: "creation"
      }
    },
    {
      all_property_changes: {
        object_type: "contact"
      }
    }
  ]
}
Benefits of the new format:
The new subscription format enables more flexible subscription filtering, including property-level filtering where you can subscribe to specific property changes (e.g., only when "dealstage" changes).
Migration Guide
Follow these steps to migrate your workflows from v4.0/v5.0 to v6.0:
Step 1: Update Authentication
- Remove any token-based authentications
- Add new OAuth2 authentication (see Authentication section)
- Update all workflows to use the new OAuth2 authentication
Step 2: Convert Subscription Configurations
Common conversion examples:
Contact creation:
- Old:
{ "contact.creation": true } - New:
[{ "standard_event": { "object_type": "contact", "event_type": "creation" } }]
Deal property changes (any property):
- Old:
{ "deal.propertyChange": true } - New:
[{ "all_property_changes": { "object_type": "deal" } }]
Company deletion:
- Old:
{ "company.deletion": true } - New:
[{ "standard_event": { "object_type": "company", "event_type": "deletion" } }]
Multiple subscriptions:
- Old:
{ "contact.creation": true, "deal.propertyChange": true } - New:
[{ "standard_event": { "object_type": "contact", "event_type": "creation" } }, { "all_property_changes": { "object_type": "deal" } }]
Step 3: Test Webhook Delivery
- Enable your updated workflow
- Trigger test events in HubSpot
- Verify workflow execution with new format
For whitelabelling purposes, it is possible to use a Custom OAuth app with the HubSpot trigger. Please see the Custom OAuth apps and webhooks section for details
Authentication
The HubSpot Trigger uses OAuth2 authentication exclusively. Token authentication (private apps) is not supported for webhooks.
OAuth2 Setup in Tray Platform
- Select the HubSpot Trigger in your workflow
- Click the Authenticate tab in the properties panel
- Click Add new authentication
OAuth2 Required: You must use OAuth2 authentication. Private applications (token-based authentication) do not support webhooks per HubSpot's API limitations.

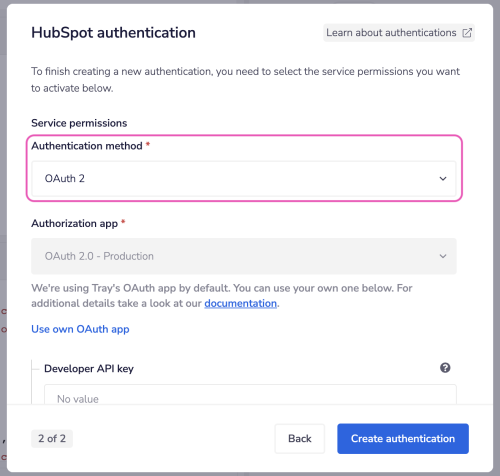
For detailed authentication instructions, including scope selection and custom OAuth app setup, see the HubSpot Authentication page.
OAuth App Configuration for Webhooks
When creating or configuring your HubSpot OAuth app to work with webhooks, you need to configure webhook settings in your app:
- Create or access your HubSpot OAuth app in your HubSpot developer account
- Configure webhook settings including the
legacyCrmObjectsarray - Add the webhook URL (see Webhook Configuration section below)
The legacyCrmObjects setting is an array containing classic subscription types (such as contact.creation and deal.deletion) that your app will support.
For complete instructions on configuring webhooks in your HubSpot OAuth app, refer to HubSpot's webhook configuration guide.
Required scopes depend on which HubSpot objects you want to monitor. Refer to the Scopes section for detailed scope requirements.
Webhook Configuration
If you are using a custom service environment (embedded solutions, whitelabeling, or custom OAuth apps), the webhook URL format requires a mandatory query parameter.
Custom Service Environment Webhook URLs
Required for Custom Environments: The app_key query parameter is mandatory for all custom service environments. Without it, webhooks will not route correctly and your workflows will not trigger.
URL Format: {base_url}?app_key={CLIENT_ID}
Where {CLIENT_ID} is the Client ID (also called "App Key" in Tray UI) from your HubSpot OAuth app.
Example URLs:
Production (US):
https://webhooks.tray.io/production/webhooks/hubspot/1?app_key=abc123-def456-ghi789
Production (EU):
https://webhooks.eu1.tray.io/production/webhooks/hubspot/1?app_key=abc123-def456-ghi789
Select the URL for your region (US or EU) and replace abc123-def456-ghi789 with your OAuth app's Client ID.
Tray Platform Requirement: The app_key parameter is mandatory for all custom service environments. This is not optional - without it, webhook events will fail to route and your workflows will not trigger.
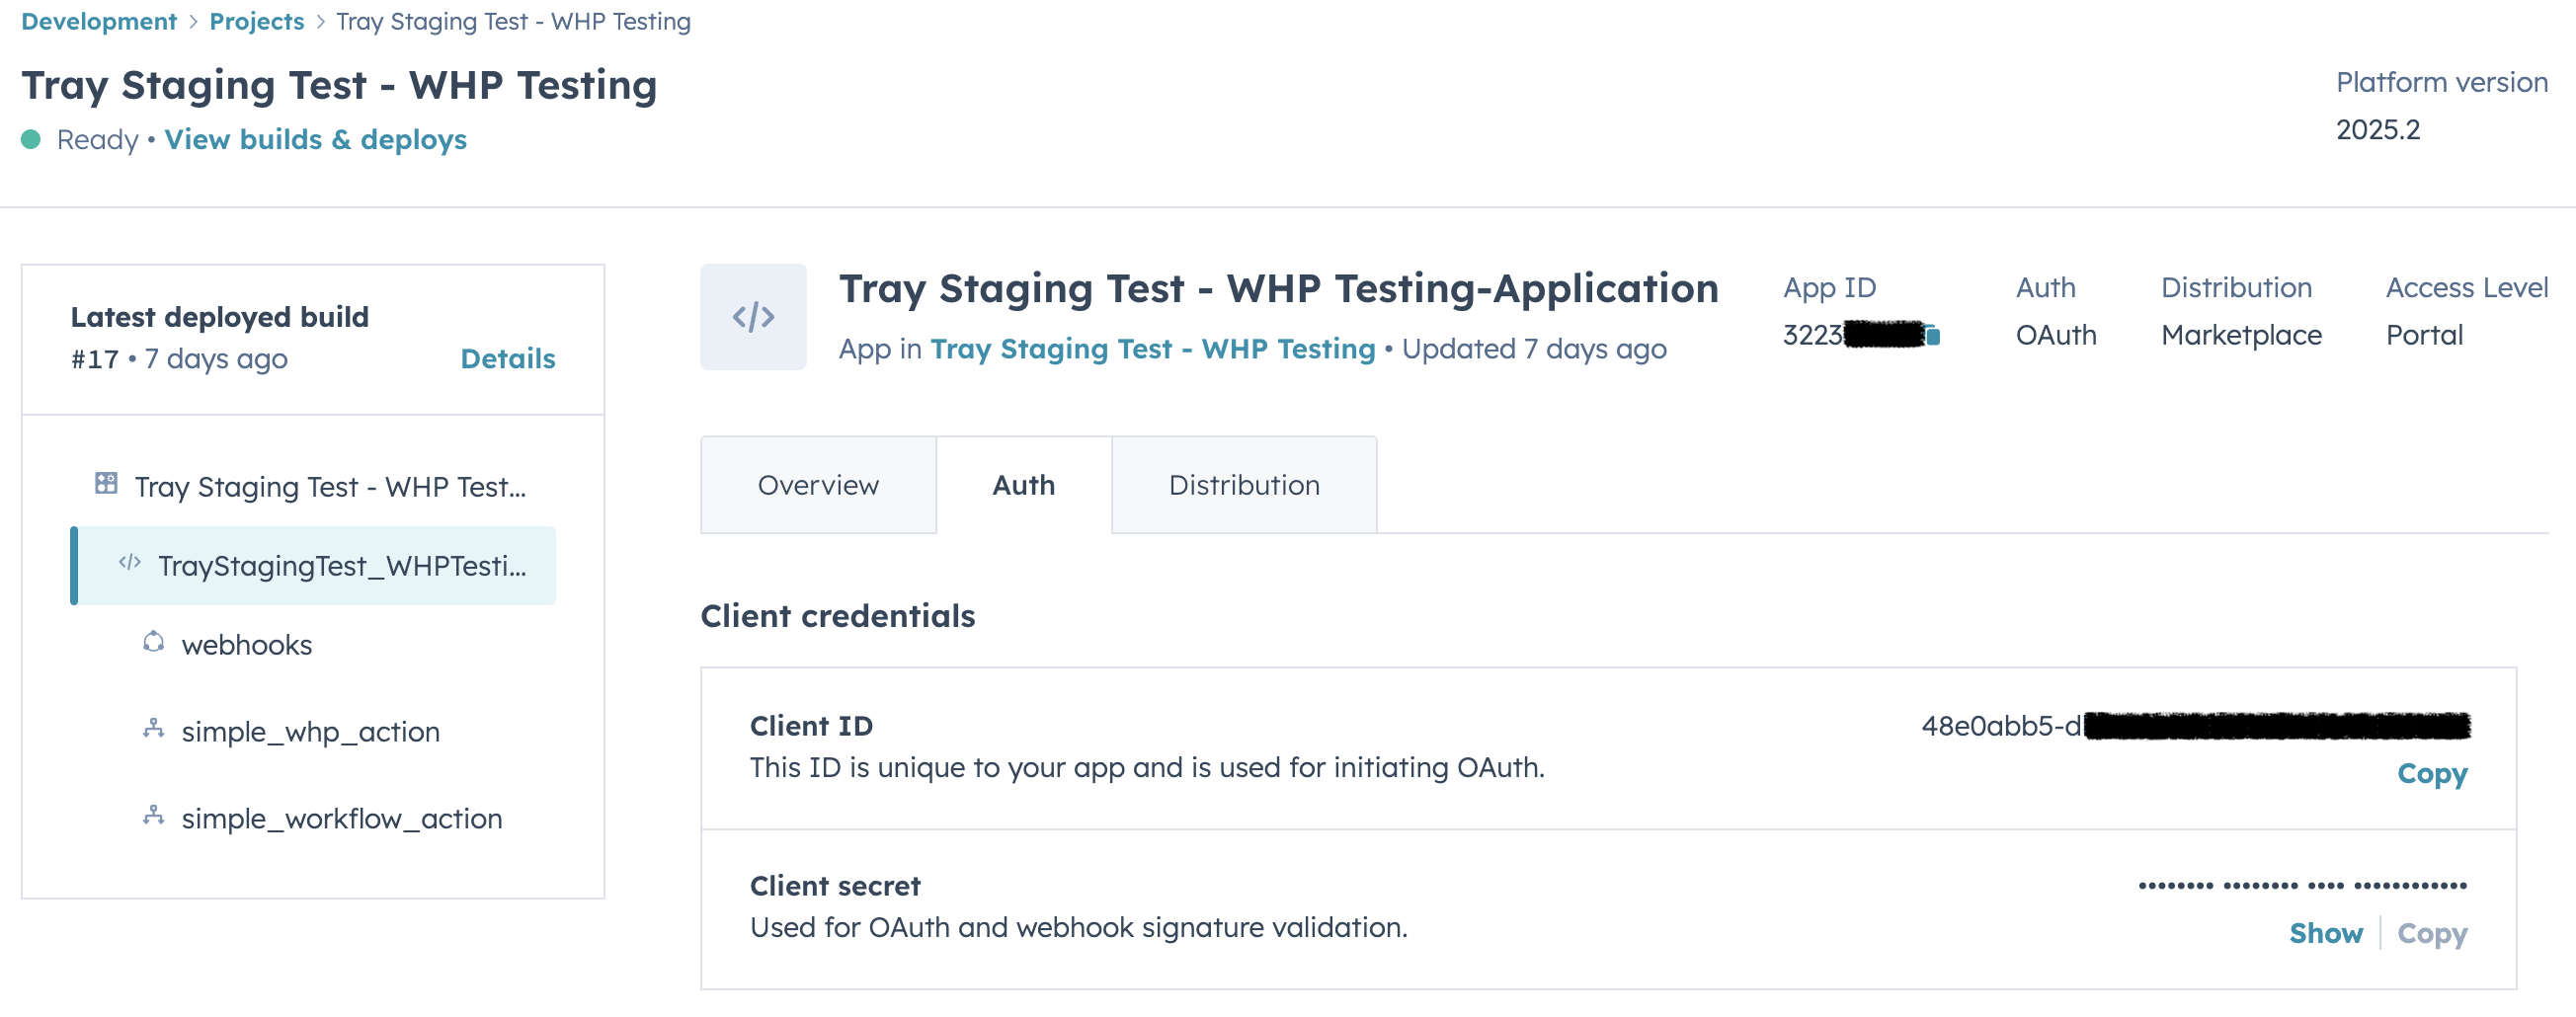
Finding Your Client ID
To find your OAuth app's Client ID:
- Navigate to your HubSpot developer account
- Open your OAuth app settings
- Go to the Auth tab
- Copy the Client ID value
- This Client ID is your
app_keyvalue for the webhook URL
For detailed OAuth app setup instructions, see Custom OAuth apps.
Configuration Guide
Because the webhook URL depends on the OAuth app's Client ID, webhook configuration requires a two-step deployment process:
You must deploy your OAuth app first to obtain the Client ID, then configure webhooks with that Client ID in a separate deployment. This applies whether you're creating a new app or adding webhooks to an existing app.
Configuration Steps:
- Create or access your HubSpot OAuth app with basic configuration (name, logo, scopes)
- Save and deploy the app to generate the Client ID
- Note the Client ID from the Auth tab
- Construct your webhook URL:
{base_url}?app_key={CLIENT_ID} - Return to your HubSpot app's webhook settings
- Add the webhook URL with the
app_keyparameter - Configure
legacyCrmObjectsarray (see HubSpot's webhook guide) - Save and deploy the webhook configuration
Why webhook configuration requires separate deployment:
- The
app_keyquery parameter (your Client ID) is only available after the app is initially deployed - Tray's webhook routing system uses this parameter to route events correctly in custom service environments
- This is a Tray platform requirement for all custom service deployments
Webhook Configuration in HubSpot
After constructing your webhook URL with the ?app_key={CLIENT_ID} parameter, configure webhooks in your HubSpot project:
- Create a
*-hsmeta.jsonfile in your project'ssrc/app/webhooks/directory - Define webhook settings including the
targetUrlwith your?app_key={CLIENT_ID}parameter - Configure the
legacyCrmObjectsarray with your subscription types - Deploy your app configuration
Example webhook configuration file:
{
  "uid": "my-webhook-config",
  "type": "webhooks",
  "config": {
    "settings": {
      "targetUrl": "https://webhooks.tray.io/production/webhooks/hubspot/1?app_key=abc123-def456-ghi789",
      "maxConcurrentRequests": 10
    },
    "subscriptions": {
      "crmObjects": [],
      "legacyCrmObjects": [
        {
          "active": true,
          "subscriptionType": "contact.creation"
        },
        {
          "active": true,
          "subscriptionType": "contact.deletion"
        },
        {
          "active": true,
          "subscriptionType": "company.creation"
        },
        {
          "active": true,
          "subscriptionType": "company.deletion"
        },
        {
          "active": true,
          "propertyName": "email",
          "subscriptionType": "contact.propertyChange"
        },
        {
          "active": true,
          "propertyName": "dealstage",
          "subscriptionType": "deal.propertyChange"
        },
        {
          "active": true,
          "propertyName": "industry",
          "subscriptionType": "company.propertyChange"
        }
      ],
      "hubEvents": [
        {
          "subscriptionType": "contact.privacyDeletion",
          "active": true
        }
      ]
    }
  }
}
Replace abc123-def456-ghi789 with your actual Client ID. Each subscription in legacyCrmObjects is an object with active (boolean) and subscriptionType properties. For property-specific subscriptions, include the propertyName field. The subscriptions shown are examples; configure your legacyCrmObjects and hubEvents arrays based on your specific integration needs. Leave crmObjects empty.
For complete webhook configuration file structure and instructions, refer to HubSpot's webhook configuration guide.
Webhook Payloads
Understanding the webhook payload structure is essential for processing events in your Tray workflows. The trigger outputs different payload formats depending on the webhook type.
Event Subscription Webhooks
When HubSpot CRM events occur (contact creation, property changes, etc.), the trigger outputs the event data wrapped in a body object.
Example Payload:
{
  "body": {
    "eventId": 2796351857,
    "subscriptionId": 251491,
    "portalId": 7985479,
    "appId": 33232,
    "occurredAt": 1593698753647,
    "subscriptionType": "contact.propertyChange",
    "attemptNumber": 0,
    "objectId": 901,
    "changeSource": "CONTACTS",
    "propertyName": "email",
    "propertyValue": "test@tester2001.com"
  }
}
Key Fields (accessed via body.fieldName):
body.eventId- Unique identifier for this eventbody.subscriptionId- ID of the webhook subscription in HubSpotbody.portalId- HubSpot account (portal) IDbody.appId- HubSpot app IDbody.occurredAt- Timestamp in milliseconds when the event occurredbody.subscriptionType- The type of event (format:{objectType}.{eventType})body.objectId- The ID of the object that changed (contact ID, deal ID, etc.)body.changeSource- Source of the change (e.g., "CRM", "CONTACTS")body.propertyName- For property changes, the name of the property that changedbody.propertyValue- The new value of the propertybody.attemptNumber- Retry attempt number (0 for first attempt)
Common Subscription Types:
contact.creation- When a new contact is createdcontact.propertyChange- When any property on a contact changesdeal.deletion- When a deal is deletedcompany.propertyChange- When any property on a company changesticket.associationChange- When associations with a ticket change
Custom Action Webhooks
When HubSpot workflows invoke custom actions, the webhook payload includes workflow context and the object being processed.
Example Payload:
{
  "callbackId": "ap-6496270-271746737576-8-0",
  "origin": {
    "portalId": 6496270,
    "actionDefinitionId": 20564589,
    "actionDefinitionVersion": 1
  },
  "context": {
    "source": "WORKFLOWS",
    "workflowId": 143220641
  },
  "object": {
    "objectId": 3101,
    "objectType": "CONTACT"
  },
  "inputFields": {}
}
Key Fields:
callbackId- Unique identifier for this custom action invocationorigin.portalId- HubSpot account IDorigin.actionDefinitionId- ID of the custom action definitioncontext.workflowId- ID of the HubSpot workflow that triggered this actionobject.objectId- The ID of the CRM object being processedobject.objectType- The type of object (CONTACT, COMPANY, DEAL, TICKET, etc.)inputFields- Custom input fields configured in the action definition
For complete webhook payload specifications and request validation details, refer to HubSpot's Webhooks API documentation.
Available Operations
Troubleshooting
Webhooks Not Firing
Check authentication:
- Verify OAuth2 authentication is active (not token-based)
- Ensure OAuth app has webhook permissions configured
- Confirm webhook URL is correctly configured in HubSpot app settings
- Verify
legacyCrmObjectsarray is correctly configured in your HubSpot OAuth app webhook settings (not other webhook configuration properties)
Check subscription configuration:
- Verify subscription array format is correct (v6.0 format, not v4.0/v5.0)
- Ensure object types and event types are valid
- Test with a simple subscription first (single standard event)
Check workflow state:
- Workflow must be enabled in Tray platform
- Trigger must be configured and authenticated before testing
Authentication Errors
"Private apps don't support webhooks" error:
- This indicates token authentication is being used
- Solution: Switch to OAuth2 authentication
- Private apps (token-based) cannot receive webhooks per HubSpot's API limitations
Property Filtering Not Working
Receiving events for all properties instead of specific property:
- Verify property name is the exact internal property name (not the display label)
- Check HubSpot Settings → Properties to confirm the internal name
- Remember: Property names are case-sensitive
- Refer to HubSpot's Properties API documentation for property names
Note: Filtering happens within the Tray workflow after HubSpot sends the webhook. The trigger receives all configured subscriptions and filters based on your array configuration.
Webhook Delivery Issues
Payloads not reaching workflow:
- Verify webhook URL is correctly configured in your HubSpot OAuth app
- Ensure the URL matches your region (US vs EU) and environment (development vs production)
- Check that your HubSpot app has the webhook feature enabled
- Test webhook delivery using HubSpot's webhook testing tools in the developer portal
- Monitor HubSpot's webhook delivery logs for failed attempts or errors
Subscription not receiving expected events:
- Verify the object type supports the event type you selected
- Check that test events in HubSpot actually match your subscription criteria
- Ensure your workflow is enabled before triggering test events
- Review the HubSpot webhook delivery logs to see what events are being sent