Notes for Custom Service Environment usage
Developer & CRM Accounts
Embedded users MUST:
- Have a Developer account in order to create OAuth applications.
- Have a CRM account in order to test as an end user. You will also need to use said Developer account when creating your authentications. Otherwise your workflows will not work.
Custom OAuth Apps
You can create custom OAuth apps to white-label your authentication dialogs during integrations.
HubSpot is actively migrating all developers to the new Developer Platform (March 2026). Legacy developer accounts and the UI-based app creation approach are being retired. All new OAuth apps must be created using HubSpot's CLI-based projects framework (version 2025.2+).
The new platform uses a CLI-driven workflow with local configuration files, enabling version control, local development, and repeatable deployments for your OAuth applications.
For migration information, see:
Creating Custom OAuth Apps (CLI/Projects Framework)
HubSpot's Developer Platform (version 2025.2+) uses an interactive CLI-based workflow to create and manage OAuth applications.
Prerequisites:
- HubSpot CLI version 7.6.0 or later (installation guide)
- Node.js environment (version 18 or higher)
- Git for version control
- HubSpot developer account (migrated to new platform)
Creating a new OAuth app:
-
Install and authenticate HubSpot CLI:
npm install -g @hubspot/cli@latest hs account auth -
Create new app project using interactive CLI:
hs project create- Select "App" as base contents
- Choose "Marketplace" or "Private" distribution
- Select "OAuth" as authentication method
- Add desired features (webhooks, cards, functions, etc.)
- CLI generates project structure with all configuration files
-
Configure redirect URLs in generated
app-hsmeta.json:- Edit
src/app/app-hsmeta.jsonto add your redirect URLs - See white-labeling section below for details
- Edit
-
Deploy app to HubSpot:
hs project upload -
Retrieve credentials from HubSpot developer portal:
- Navigate to your app in HubSpot UI
- Go to Auth tab to find Client ID and Client Secret
-
Use in Tray by selecting "Use own OAuth app" and entering credentials
For complete setup instructions, CLI commands, and configuration options, refer to HubSpot's Create an App guide and Developer Platform Overview.
White-labeling:
To white-label your authentication dialogs, configure redirect URLs in your app-hsmeta.json file:
{
  "uid": "my-app",
  "type": "app",
  "config": {
    "name": "My Application Name",
    "auth": {
      "type": "oauth",
      "redirectUrls": [
        "https://auth.tray.io/oauth2/token",
        "https://your-org.integration-authentication.com/oauth2/token"
      ],
      "requiredScopes": ["oauth", "crm.objects.contacts.read"]
    }
  }
}
Your first redirect URL should be https://auth.tray.io/oauth2/token followed by your custom white-label domain https://your-org.integration-authentication.com/oauth2/token (replace your-org with your organization name). See white-labeling documentation for more details.
If you need a self-hosted redirect URL, contact support as it requires additional setup.
Scopes:
Define required scopes in your app-hsmeta.json configuration file. However, similar to the legacy approach, it's recommended to leave scopes flexible in your OAuth app and control them when creating authentications in Tray. This allows multiple integrations to use the same custom OAuth app.
Webhooks:
If you need webhook functionality with the HubSpot Trigger connector, webhook configuration is also done via files in your project's src/app/webhooks/ directory. See the HubSpot Trigger documentation for complete webhook setup instructions including the two-step deployment process.
Retrieving your credentials:
Once deployed:
- Navigate to your app in the HubSpot developer portal UI
- Go to the Auth tab to find your Client ID and Client Secret
- Copy these credentials for use in Tray (see next section)
Using Your Custom OAuth App in Tray
After creating your OAuth app in HubSpot (using either the CLI/projects framework or the legacy UI) and obtaining your Client ID and Client Secret, follow these steps to use it in Tray:
Legacy: UI-based OAuth App Setup
This UI-based approach has been deprecated. HubSpot completed migration of all developer accounts to the new Developer Platform (March 2026). The legacy UI for creating OAuth apps is no longer available. Existing apps created via the UI will continue to work, but all new apps must use the CLI/projects framework documented above.
For migration guidance, see:
The following steps document the legacy UI-based approach for creating OAuth apps in HubSpot. If you have existing OAuth apps created this way, they will continue to function, but you should plan to migrate them to the new platform.
Once you've created your app using the steps below, see the Using Your Custom OAuth App in Tray section for instructions on configuring it in Tray.
After creating your OAuth app using these steps, continue to the Using Your Custom OAuth App in Tray section above to configure it in your Tray workflows.
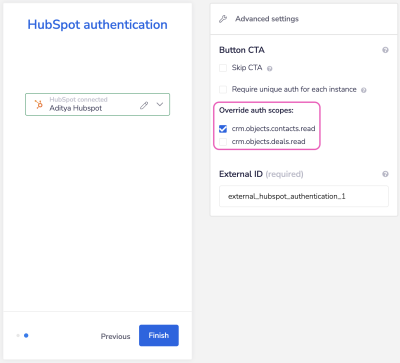
Scopes
Please be aware of the following points when dealing with scopes while using an Embedded account:
- The scopes you use for your source / master workflow are the scopes that your end users will have when creating the auth.
- You can also override scopes in the solution editor. This will allow you to specify that only a subset of the scopes set in the master workflow are available to your End Users. Please reach out to your Tray technical support if you wish to activate this feature.
- When creating an OAuth app using HubSpot's CLI, you shouldn't set granular scopes in your configuration file. This way, you would have to create a custom OAuth app for every integration that you create for this service to enforce scope limitation.
- A better way would be to use the standard method of setting the scopes when you are creating an authentication in your source / master workflow for each Solution. This way you can have multiple integrations that use the same custom OAuth app and control them within Tray.